


ChinaCNCzone CNC 6090, CNC 6040 Mach3 Settings and Setup
ChinaCNCzone
2017-06-12 16:34:06
ChinaCNCzone CNC 6090, CNC 6040 Mach3 Settings and Setup


2.1 Setp One: Open the MACH 3 MILL
After restarting the PC, choose the MACH 3 MILL icon on the desktop to start the Mach 3.
After restarting the PC, choose the MACH 3 MILL icon on the desktop to start the Mach 3.
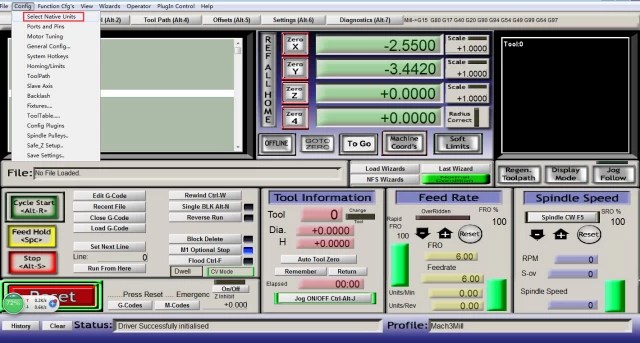
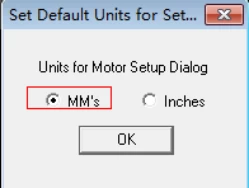
2.2 Step Two: Config -- select Native Units
Open the “Config -- select Native Units” menu, then choose the “MM’s”
Open the “Config -- select Native Units” menu, then choose the “MM’s”
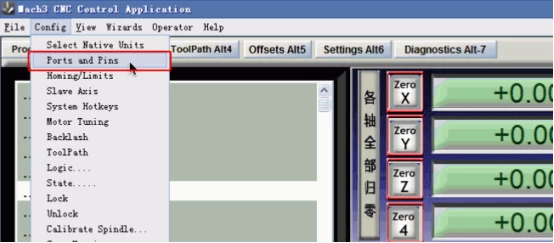
2.3 Step Three: Set up Config--Ports and Pins
See as below,open”Config--Ports and Pins” to enter the setup.
See as below,open”Config--Ports and Pins” to enter the setup.
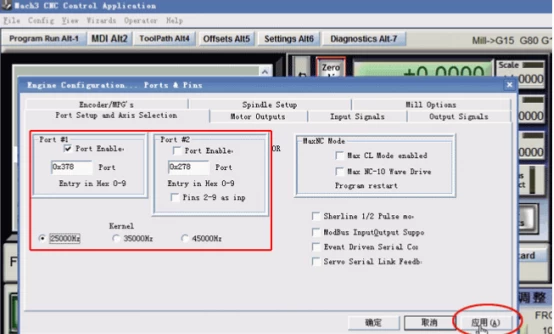
2.4 Step Four: Check data
To check whether all the data is same as the following red big rectangle and then choose OK to continue.
To check whether all the data is same as the following red big rectangle and then choose OK to continue.
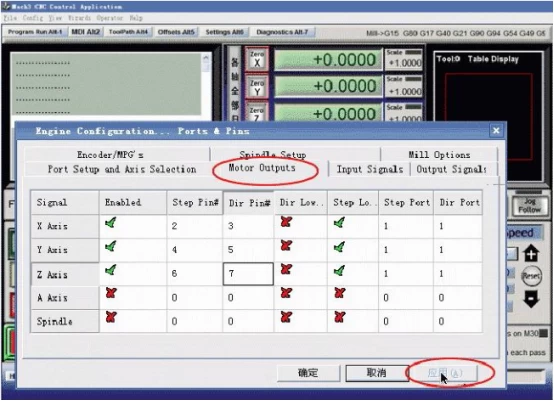
2.5 Step Five: Click Motor Outputs
Click “Motor Outputs” to setup the Pin of the stepper motor as follow
Click “Motor Outputs” to setup the Pin of the stepper motor as follow
This part is very important, please check your setup is as same as the data above. Even a small error will cause the machine working incorrectly. Do not forget to save the setup.
Remark:
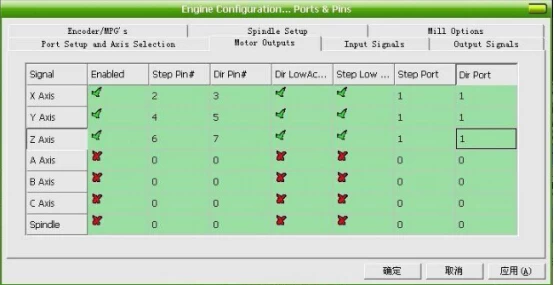
(1). If you want to use the 4th axis(A axis), you can setup the A axis data as follows
(1). If you want to use the 4th axis(A axis), you can setup the A axis data as follows
(2).”Dir Low Active” This choice is to set up the Direction of the motor, if you find the running direction of the axis is inverse, you can choose the “Dir Low Active” to change the direction and then save the setup. As below picture:
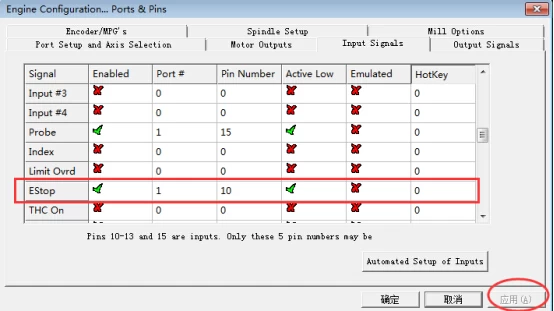
2.6 Step Six: Setup the E-stop
The clients who bought the Control box from us, need to setup the E-stop signal, still in “Ports and Pins” menu to click “Input Signals” to find the “Estop”, then setup as follow, final Click “Apply”and then save.( Emergency setting )
The clients who bought the Control box from us, need to setup the E-stop signal, still in “Ports and Pins” menu to click “Input Signals” to find the “Estop”, then setup as follow, final Click “Apply”and then save.( Emergency setting )
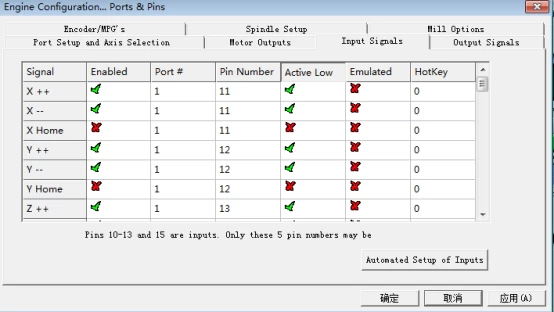
2.7 Step Seven: Setup the Limited Switches
Limited Switch Setting in “Ports and Pins” menu to click “Input Signals” and set X, Y, Z as below:
Limited Switch Setting in “Ports and Pins” menu to click “Input Signals” and set X, Y, Z as below:
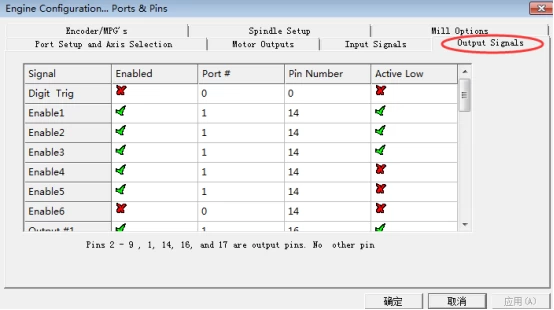
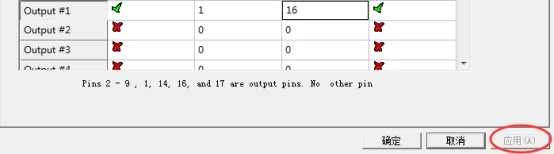
2.8 Step Eight: Setup the output signals
Output signals setting in “Ports and Pins” menu to click “Output Signals”, set as below, and then save.
Output signals setting in “Ports and Pins” menu to click “Output Signals”, set as below, and then save.
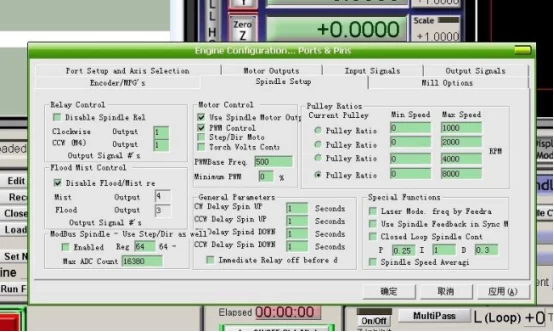
2.9 Step Nine Setup the spindle
Spindle setup in “Ports and Pins” menu to click “Spindle Setup”, set as below, and then save.
Spindle setup in “Ports and Pins” menu to click “Spindle Setup”, set as below, and then save.
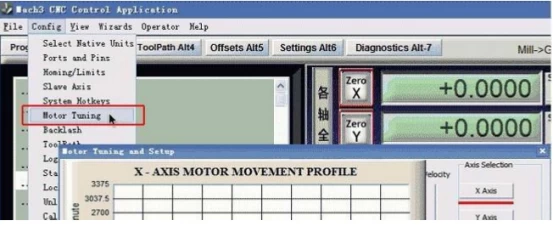
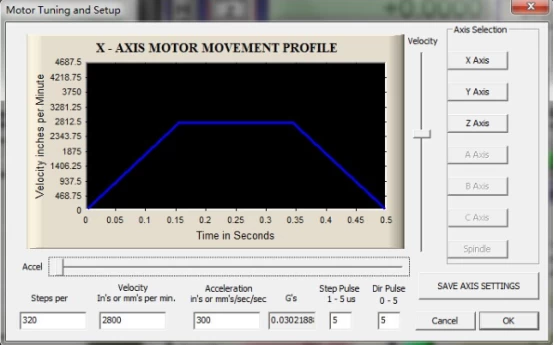
2.10 Step Ten: Setup the stepper motor and A axis
The setup of the Stepper motor: Config-- Motor Tuning--- X Axis---setup the X axis as follows---then“SAVEAXIS SETTINS”, then setup the Y axis and Z axis,final click “OK”.
X Axis, Y Axis, Z Axis parameters should the same.
The setup of the Stepper motor: Config-- Motor Tuning--- X Axis---setup the X axis as follows---then“SAVEAXIS SETTINS”, then setup the Y axis and Z axis,final click “OK”.
X Axis, Y Axis, Z Axis parameters should the same.
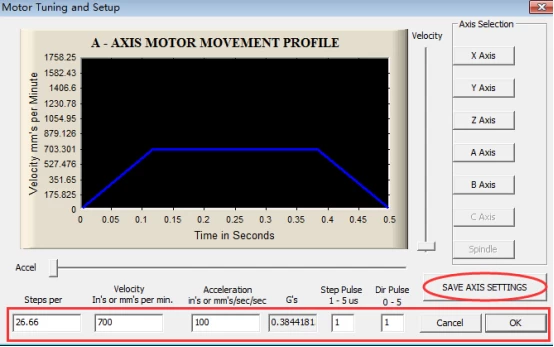
If you need to use A axis, pls settp as below:
As far as now, the 6040 CNC router and 6090 CNC router setup is over, Please close the Mach software that all data setup can be available. And then open it again to check whether all the data is correct otherwise can’t run your mini CNC router machine well.
ChinaCNCzone,to be your best China CNC router, fiber laser larking machine, CO2 laser engraving machine supplier.